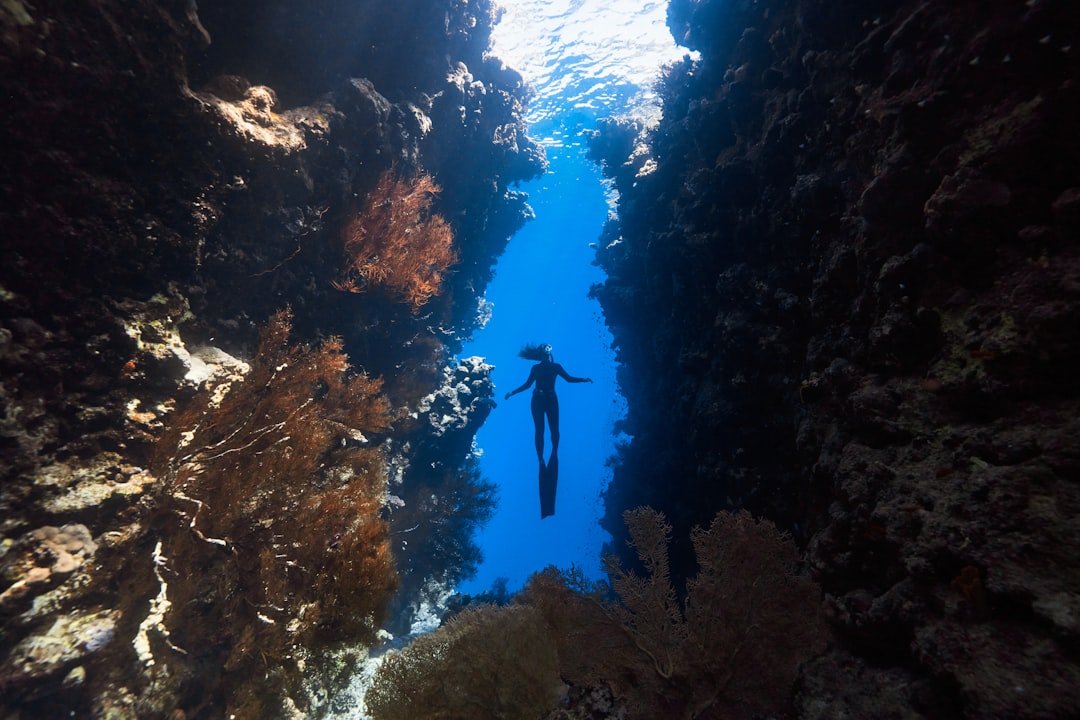
When learning how to photograph divers underwater, picture the familiar moment when your buddy stops over a reef, looks at the camera, and instantly hangs vertical with loose arms and fins in the frame. Give them one clear position, shoot slightly upward, and leave space around their body before you press the shutter. That is the fast answer. How to photograph divers underwater well is mostly about planning the frame before the diver drifts into it, then working calmly enough that neither of you loses buoyancy, depth awareness, or the route back to the group.
How to photograph divers underwater with a clear plan
Decide what the photograph is about before you signal your subject. Is the diver there to show the scale of a wreck, add a human element to a reef scene, or make a portrait with bubbles and blue water behind them? Pick one idea. A diver photographed over a coral head needs a different position than a diver framed in a swim-through, and trying to capture both ideas in one hurried shot often leaves the image busy and flat.
Brief your buddy at the surface, on the boat, or during a calm moment before descent. Keep the request simple: stay horizontal, look where you are swimming, hold the light away from your torso, and pause when you reach the chosen feature. Use familiar hand signals. A detailed underwater conversation is rarely practical, especially in current, limited visibility, or a site with a strict time plan.
Agree on a stop signal too. If the diver is low on gas, cold, task-loaded, or uncomfortable, end the photo attempt and continue the dive. The picture can wait. A camera task should never pull attention away from the buddy team, ascent plan, no-decompression limit, or local site rules, so practice these approaches with a certified instructor if underwater communication or buoyancy still feels demanding.
Put the diver in a natural position
The most useful pose is usually a diver swimming slowly in good trim, with knees relaxed, fins behind the body, and arms close rather than spread wide. Horizontal trim makes the person look purposeful and reduces the visual clutter that appears when dangling gauges, hoses, and fins point in different directions.
Ask the diver to look ahead rather than directly into the lens for a wider environmental photograph. Their mask will show a clean profile, and the image feels like a moment within the dive instead of a posed inspection photo. For a portrait, eye contact can work well. Get close enough that the mask and face are large in the frame, but do not crowd the diver or block their view of the environment.
Hands cause more awkward photographs than most people expect. A hand resting lightly on a chest strap, holding a torch in a useful direction, or making a normal dive signal can look better than two hands floating in front of the mask. Avoid staged hand poses. They often look unnatural underwater and may put hands near coral, sediment, or fragile marine life.
Fins deserve attention as well. If one fin is cut off at the edge of the frame, crop decisively at the thigh or move closer so the crop looks intentional; a partial fin tip tends to look accidental. The same rule applies to loose hoses, another diver’s fin, and bright equipment fragments that pull the viewer away from your subject, so check the edges before shooting.
Use posing and composition tips that simplify the frame
A low camera angle is one of the most reliable composition choices for divers underwater. Descend or hover safely below the subject, then aim slightly upward so blue water fills the background behind their head and torso. This separates the diver from the reef and can make even a modest site look more open, while a downward angle often replaces blue water with a patchwork of sand, broken coral, or dark rock.
Place the diver off-center when there is somewhere for them to travel into. If they face right, leave more open water on the right side of the frame than behind their fins. This gives the image direction. Centering works better when the diver is symmetrical in a cave opening, doorway, or wreck hatch, where the setting itself creates a balanced shape.
Use reef lines, wreck rails, kelp stalks, or a sandy slope to guide the eye toward the diver. Move a few fin kicks left or right if a rail appears to grow out of the mask, or if a coral formation slices through the body at an odd point. Small changes in your position can do more than changing camera settings and help keep those lines clean.
Think in layers for wide-angle images. A close foreground detail gives depth, the diver occupies the middle distance, and blue water or a wreck structure sits behind them. Do not force it. If adding a foreground coral requires touching the bottom, stirring sand, or squeezing into a narrow space, choose a cleaner two-layer composition instead.
Negative space is useful when the water is clear and blue. A small diver placed against open water can communicate scale, especially beside a wall, large fan coral, or wreck section. The subject still needs enough contrast that they do not disappear into a dark blue background, so look for a brighter patch of water or angle them where ambient light catches their tank and mask.
Manage bubbles, light, and background
Bubbles can add movement, but they also cover faces. Fire a short sequence just after your buddy exhales if you want a visible bubble trail, then wait a beat for a cleaner mask view if the portrait matters more. Different divers have different breathing rhythms, so take a few frames and adjust instead of predicting the exact moment.
For natural-light wide shots, keep the sun behind or slightly to one side of the camera when possible. This puts more light on the diver’s face and front of the body. A sunball can work if you expose carefully, but it is easy to turn the diver into a silhouette and lose detail in the water surface.
Strobes help restore color and definition at close range, especially on a diver near a reef or wreck. Start with them wide of the housing and angled slightly outward, so the edges of the beams light the subject instead of firing straight through the water in front of the lens. If bright particles fill the image, backscatter is the warning sign: move closer, lower strobe power, or widen the strobe position before making large exposure changes.
Do not light a subject from too far away and expect a strobe to solve green or blue water. Water absorbs light quickly. Get physically closer while leaving the diver enough room to swim, and use the widest practical lens for your camera system so proximity does not cut off their fins or tank.
Choose settings that support the shot
For a moving diver with a wide-angle lens, a useful starting point is a shutter speed around 1/125 to 1/200 second, an aperture around f/8, and a low ISO that still gives workable ambient exposure. The right values depend on depth, visibility, sun angle, camera sensor, housing controls, and whether you use strobes, so review the histogram and image preview rather than treating any setting as fixed.
If the background water is too bright, first raise shutter speed within your camera’s strobe-sync limit or close the aperture a little. If the diver is dark while the water looks right, increase strobe output or reduce the camera-to-subject distance. Changing one thing at a time makes it easier to see which adjustment fixed the frame and prevents a rushed series of random setting changes.
Use continuous autofocus if your camera tracks reliably underwater, and place the focus point on the mask or upper torso. For a slow, cooperative pose, single autofocus can be more predictable. Check focus early. A slightly soft face is hard to rescue later, even when the color and composition are excellent.
Follow a repeatable shooting sequence
- Choose the background before signaling the diver. Find blue water, a clear wreck opening, or a reef section without loose debris.
- Set exposure and strobe position first. Take a test frame of the scene without the diver if conditions allow.
- Signal the diver into the frame. Ask for horizontal trim and a slow, steady approach.
- Move below their eye line when safe. Keep an eye on depth, bottom clearance, current, and the rest of the buddy team.
- Shoot a short burst as the diver reaches the best position. Then stop, check the result, and move on with the dive.
This sequence reduces aimless chasing. It also respects the fact that a good underwater image often takes only a few seconds once the angle, exposure, and pose are ready. If you need repeated attempts, reassess the plan rather than keeping your buddy hovering in one place until gas, cold, or current becomes a problem.
Fix common diver-photo problems
If the diver looks tiny, get closer rather than relying on a later crop. Wide lenses reward proximity. A close camera position also reduces the amount of water between lens and subject, which usually improves contrast and color when visibility is limited.
If the frame looks flat, lower your shooting angle and look for a foreground object or diagonal line. If it looks crowded, remove something. Swim a little sideways, wait for another diver to clear the background, or crop your concept to a tighter portrait instead of trying to include every interesting object at the site.
If your buddy appears stiff, stop asking them to pose. Tell them to swim a normal route past the subject while you hold position and photograph the pass. This often creates better fin position, relaxed hands, and a more believable line of sight than a stationary pose.
If sediment appears in every image, you may be too close to the bottom or your buddy’s fin wash may be reaching the scene. Back off and rise slightly. Good buoyancy control is part of underwater photography, but no camera technique replaces appropriate training, careful site selection, and an honest assessment of your comfort in the conditions.
Make the photo fit the dive
The strongest diver photographs usually look calm because the dive itself was calm. Plan the shot around the site briefing, get the easy image early when gas and attention are fresh, and accept that poor visibility or surge may call for a close portrait rather than a grand reef scene. A safe, enjoyable dive with one clean frame beats a stressful attempt at a complicated composition every time.
Related posts
This article is for general informational purposes only and is not dive training or medical advice. Always train with a certified instructor and consult a doctor before diving if you have any health concerns. Gear specs, pricing, site conditions, and operator schedules change, so verify current details directly with the manufacturer or dive operator.
Disclosure: This post may contain affiliate links. If you click through and make a purchase, we may earn a commission at no extra cost to you. We only recommend gear we’ve researched or genuinely believe in.