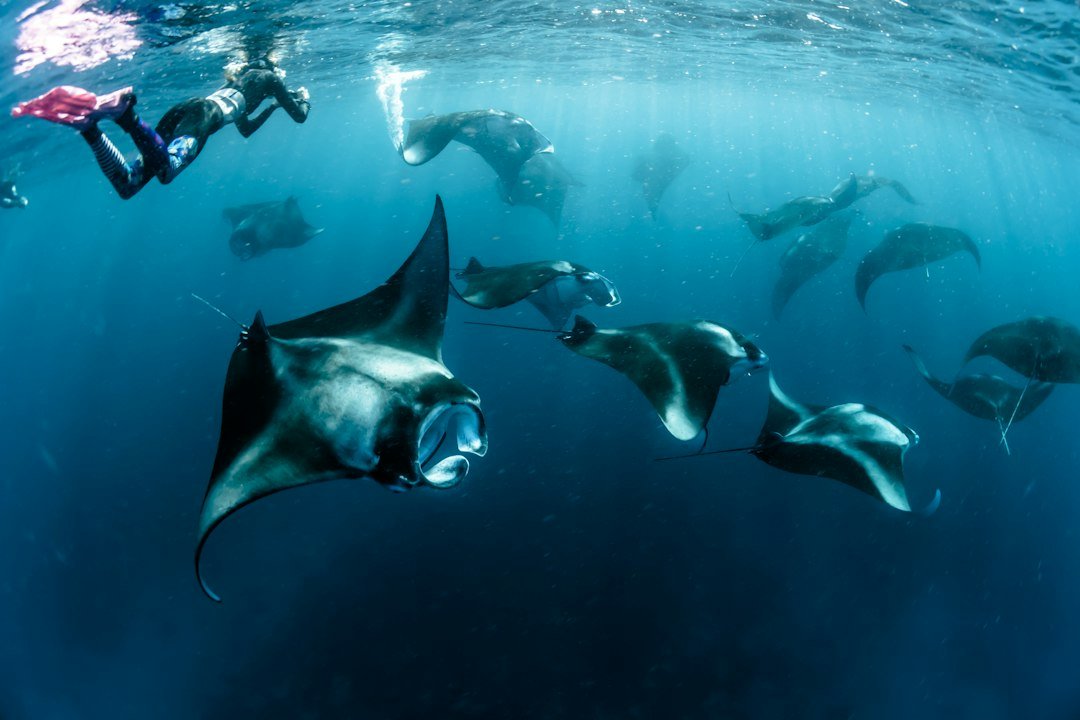
To photograph manta rays underwater, use a wide lens, expose for the water and sky first, then wait low and slightly ahead of the ray’s line of travel. How to photograph manta rays underwater also comes down to restraint: keep your distance, avoid blocking a cleaning station or feeding lane, and let the animal choose whether it passes close enough for a frame.
Mantas are large, but they move faster than their size suggests when they bank, turn, or ride current near a cleaning station. The strongest images usually show a clean body outline against blue water, a visible eye, and enough space around the wingtips that the animal does not feel cramped in the frame.
How to photograph manta rays underwater with camera settings and positioning
Start with manual exposure and shoot RAW if your camera allows it. RAW files give you more room to correct white balance and recover modest highlight detail later, which matters when a pale manta belly passes under bright tropical surface light.
For a daytime manta scene with strobes, a practical starting point is 1/160 to 1/250 second, f/6.3 to f/8, and ISO 200 to 400. That combination keeps a reasonable depth of field across the cephalic fins and broad wings while limiting blur from a normal cruising pass.
If you are shooting without strobes, raise the shutter speed before raising aperture or chasing a very low ISO. Try 1/250 second, f/5.6 to f/8, and ISO 400 to 800 as a starting point, then adjust based on the available light and your camera’s noise performance.
Many underwater cameras have a flash-sync ceiling, often near 1/200 or 1/250 second, but the exact limit can vary by camera body, housing, trigger, strobe, and shutter mode. Confirm your own housing and camera combination before the trip. A shutter speed above that limit can create a dark band across the image when strobes fire, and electronic shutter modes may change the result again.
Use continuous autofocus with a broad tracking area, zone, or expanded central point rather than a tiny single point. Place the focus area near the manta’s eye or leading edge as it approaches, then hold the shutter release through a steady pass while keeping your finning gentle and controlled.
Back-button focus can help if your camera setup supports it and you already use it comfortably. Pre-focus on a point in the water where mantas regularly pass, then make small corrections as the animal arrives, rather than repeatedly allowing the camera to lock onto particles between you and the subject.
Choose the right lens and frame
A fisheye lens is usually the easiest choice when mantas pass close, because it covers the whole animal at short range and retains a lot of blue water around it. On a full-frame system, a fisheye around 8 to 15 mm is common, but focal lengths and usable coverage vary by camera, housing, port, and lens design; smaller-sensor systems need their own equivalent coverage.
A rectilinear ultra-wide lens can produce a more natural-looking shape, especially when the manta is farther away or you want a reef edge in the composition. It needs more working distance than a fisheye, though, and that extra water can soften contrast and reduce detail. Get close respectfully.
Do not zoom in because the ray looks small on the screen. Swim position, patience, and a wide view are usually more useful than focal length, since zooming narrows your framing and increases the chance of cutting off a wingtip during an unexpected turn.
Try to frame the manta on a diagonal as it approaches, with one wing slightly nearer than the other. A head-on image can work beautifully when the cephalic fins are open and the mouth is visible, but it needs symmetry and a level camera to avoid looking accidental.
Position yourself without disrupting the manta
Follow the briefing from the local dive operator, especially at cleaning stations and known feeding areas where site rules may set specific positions or prohibit strobes. Local procedures are there to limit crowding and give the animals a predictable route through the site.
Settle near the bottom or hold a stable midwater position only where the guide permits it, then face into the likely approach route without sitting directly in it. A manta will often pass more naturally when divers stay still, keep bubbles out of its path, and avoid sudden arm movements.
A low shooting angle makes the manta look larger and allows blue water or sun rays to sit behind it, but do not kneel on living coral or grab rock for stability. Good buoyancy and trim are part of the camera technique here, because a drifting fin can damage the very habitat you came to photograph.
Position slightly to one side of the approach line instead of directly in front of the animal. This gives the manta open water to continue its route, lets you see the eye and mouth in profile, and reduces the chance that your camera becomes an obstacle at the closest point.
Never touch, ride, feed, or intentionally funnel a manta toward another diver. Do not use a camera rig to attract its attention either. Mantas may approach on their own, but the choice should remain theirs, and a close encounter is not a reason to break the site’s wildlife rules.
Use strobes without backscatter
Strobes can add detail to a manta’s underside, which often records darker than the blue water behind it. They work best when the ray is close enough for the light to reach it cleanly, typically within a few feet rather than across a wide gap filled with suspended particles.
Start with both strobes extended outward on long arms, aimed slightly away from the lens axis and toward the outer edges of the frame. This reduces the amount of light that strikes particles directly in front of the port, which is the usual cause of bright backscatter spots.
Use low to medium power for close passes, then review the first few frames for blown highlights on the white belly. If the belly is too bright, lower strobe output before changing shutter speed, since shutter speed mainly changes the ambient blue background when working within normal flash-sync limits.
For a dramatic silhouette, turn the strobes off and expose for the bright surface. Meter the water near the surface, use a faster shutter speed within your camera’s capabilities, and wait for the manta to cross between you and the light while keeping the body shape distinct.
Some operators or marine areas restrict flash photography, and repeated strobe use around wildlife is not welcome everywhere. Ask before the dive. If flash is allowed, avoid firing rapid bursts at a manta that appears to change direction, speed up, or avoid the camera position. Animal behavior comes first.
A practical setup sequence
- Before entry: Clean the port, check battery and card space, and set RAW capture.
- Set exposure: Begin at 1/200 second, f/7.1, ISO 200 with strobes, then take a blue-water test frame.
- Set focus: Select continuous autofocus and a usable tracking zone. Focus on a distant diver or reef edge.
- Place strobes: Extend the arms and point the strobes outward. Start at low power.
- At the site: Choose a permitted position, stop swimming, and watch the manta’s route before lifting the camera.
- After a pass: Check sharpness, clipped highlights, and backscatter, then alter only one setting before the next pass.
Here is a useful worked example. If your test frame at 1/200 second, f/7.1, ISO 200 shows pale blue water and a dark manta, first raise ISO to 400 for more ambient exposure, then lower strobe power if the close belly becomes too bright; do not immediately open the aperture and lose the depth of field that keeps the wings sharp.
Handle current, depth, and surface light
Strong current can make manta photography physically demanding because you must hold position while managing your camera, buoyancy, and awareness of other divers. If you cannot stay stable without kicking hard, take a wider environmental frame or put the camera down and focus on a safe, controlled dive. Follow standard diving safety principles at all times: stay within your training and dive plan, monitor gas and no-decompression limits, maintain buddy awareness, and end the camera task if conditions deteriorate.
At shallower depths, bright surface light can cause clipped highlights behind the manta. A slightly faster shutter speed, lower ISO, or smaller aperture darkens the blue background, but each adjustment affects the image differently, so change one variable and review the result rather than guessing.
At deeper sites or late in the day, color fades and autofocus slows. Keep your subject close, use a focus light only if local rules allow it and it does not disturb wildlife, and accept a slightly higher ISO if it gives you a sharper image.
If you are newer to buoyancy or camera task loading, make several dives with the camera pointed downward at non-sensitive subjects before attempting a manta station. A certified instructor can help you build the trim, propulsion, and situational awareness needed to use a large rig without damaging the reef or distracting from your buddy and gas plan.
Common manta photo mistakes
The most common error is shooting from too far away. A distant manta surrounded by a lot of water looks impressive in person but often becomes a small, low-contrast shape in a photograph, especially after the image is viewed on a phone screen.
Another mistake is pointing strobes straight ahead at full power. That setup lights particles first, creates a snowstorm of backscatter, and can leave the manta overexposed at the nearest point of its pass.
Many otherwise good frames fail because a wingtip is clipped, the camera is tilted, or the manta is placed dead center with no direction to swim into. Compose a little wider than feels necessary, level the camera, and leave open water ahead of the manta’s face.
Do not spend every encounter staring at the rear screen. Review only when the manta has moved away, then return your attention to the site, your buddy, depth, gas supply, no-decompression status, and the guide’s signals. The dive still comes first.
Frequently asked questions
What camera setting is best for manta rays?
For daylight shots with strobes, begin around 1/160 to 1/250 second, f/6.3 to f/8, and ISO 200 to 400. Without strobes, use a faster shutter when possible and raise ISO as needed to keep the manta sharp. Test before the pass.
Should I use a fisheye lens for manta rays?
Yes, if mantas may come close. A fisheye lets you fill the frame at short distance and include blue water or the surface above, while a rectilinear ultra-wide lens works well for more distant rays and less curved outlines. Choose for distance.
Can I use flash when photographing manta rays?
Only when the operator and site rules permit it. Keep strobe power modest, aim the strobes outward to control backscatter, and stop using flash if local guidance prohibits it or the animal appears to alter its behavior around the camera. Follow the briefing.
Where should I position myself for a manta photo?
Stay in the permitted area, low and slightly off the manta’s expected route, with open water ahead of it. Never block a cleaning station, crowd the animal, or swim after it for a closer shot.
Related posts
This article is for general informational purposes only and is not dive training or medical advice. Always train with a certified instructor and consult a doctor before diving if you have any health concerns. Gear specs, pricing, site conditions, and operator schedules change, so verify current details directly with the manufacturer or dive operator.
Disclosure: This post may contain affiliate links. If you click through and make a purchase, we may earn a commission at no extra cost to you. We only recommend gear we’ve researched or genuinely believe in.